⚠I am going to be showing you all my fails and successes⚠
The third trial was a success.
Trial 1:
- Lots of water put into cup (about 3/4)
- Added a few pumps of soap
- Added paint and mix
- Blow bubbles
- Put paper to bubbles made
This technique did not work. I am thinking it did not work because I added the water first, then the soap and then the paint. When I added the paint it sank to the bottom when the soap was all at the top and was still white (paint color was blue). Therefore, the bubbles turned out clear and nothing happened.
THIS METHOD DID NOT WORK
Trial 2:
- Add paint into cup (this time the paint was gold)
- Add a few pumps of soap into cup
- Fill cup with lots of water (about 3/4 again)
- Blow bubbles
- Put paper to bubbles made
This technique did not work either. My guess for why this is happening is because the paint I chose (gold) was too light. When I looked at the paper, there were faint shimmery spots but I wanted to see the whole bubble imprint. I also think I put wayyyyy too much water. Because when I let my little sister blow bubbles, she blew really hard and water went flying all over.
THIS METHOD DID NOT WORK
Trial 3:
- Put a large amount of paint into cup (I used blue paint again)
- Put about 5 pumps of soap
- Mix well until soap turns into the color of the paint
- add a little bit of water (about 1/4)
- Blow bubbles
- Put paper to bubbles
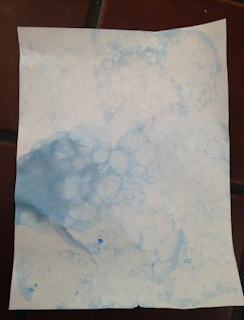
This technique finally did work. I think what is needed is a high concentration of soap and paint to a little bit of water. Then when you blow the bubbles it doesn't look like there is paint, but there is. And when you put the paper to the bubbles it shows a great design. Pictures will be below.
THIS METHOD DID WORK
🎨 On the mid-left side of the picture there is a large blue blob. This happened because bubbles split over the side of the cup I was using. I thought it would be a cool idea to get all the bubbles onto my paper, but it just turned into a large mess. But overall it looks really good.
🎨 I did use regular printer paper which if you can see the paper curled up. Probably if you want to use this other than just for fun purposes, I would use card stock paper.
🎨 With this bubble art we have just created you could make cards, use it as literal art that you hang up, create notebook covers, or do whatever you want.
I hope you all enjoyed this post. I did put a lot of work into this post which is one of my goals for 2017. Comment below what some of your goals are for 2017. Stay tuned next week for another blog post at 12:00pm EST http://everytimezone.com/ (This link is to help aid you in what time it will be in your time zone at 12:00pm EST. I do sometimes post at other times during the week so please subscribe if you would like to be notified of when I post.
-Caroline
"Good people are like candles; they burn themselves up to give others light."


No comments:
Post a Comment